

There’s a quiet kind of satisfaction that comes from saying, “Hey Siri, good night,” and watching your house respond without fuss. That’s when the lights soften, the doors lock, and then the thermostat settles in, without juggling apps or shouting across rooms. Just a home that knows the rhythm of your day.
For many Apple users, that’s the real appeal of building a smart home with Siri. It brings a sense of calm through reliable automation. If you’ve ever felt curious about Apple HomeKit, but also a little unsure where to start, this guide is for you. It shows you how to turn your home smart with Siri step by step, in a way that feels practical, secure, and genuinely livable.
What a Siri Smart Home Actually Is (and Isn’t)
A Siri-powered smart home runs through Apple Home (formerly HomeKit). Siri is the voice that controls it. The real work happens behind the scenes through the Home app, which connects compatible devices into one organized ecosystem.
What Siri does well:
- Controls lights, plugs, thermostats, locks, cameras, and more with natural voice commands
- Runs scenes and automation quietly in the background
- Keeps everything synced across your iPhone, iPad, Apple Watch, Apple TV, and HomePod
- Prioritizes privacy with end-to-end encryption
It doesn’t require a full-house renovation, constant tinkering, or any deep tech expertise to work well. Once everything is set up, you won’t be juggling a dozen different apps either. Think of Siri as the polite house manager who quietly keeps everything running smoothly in the background.
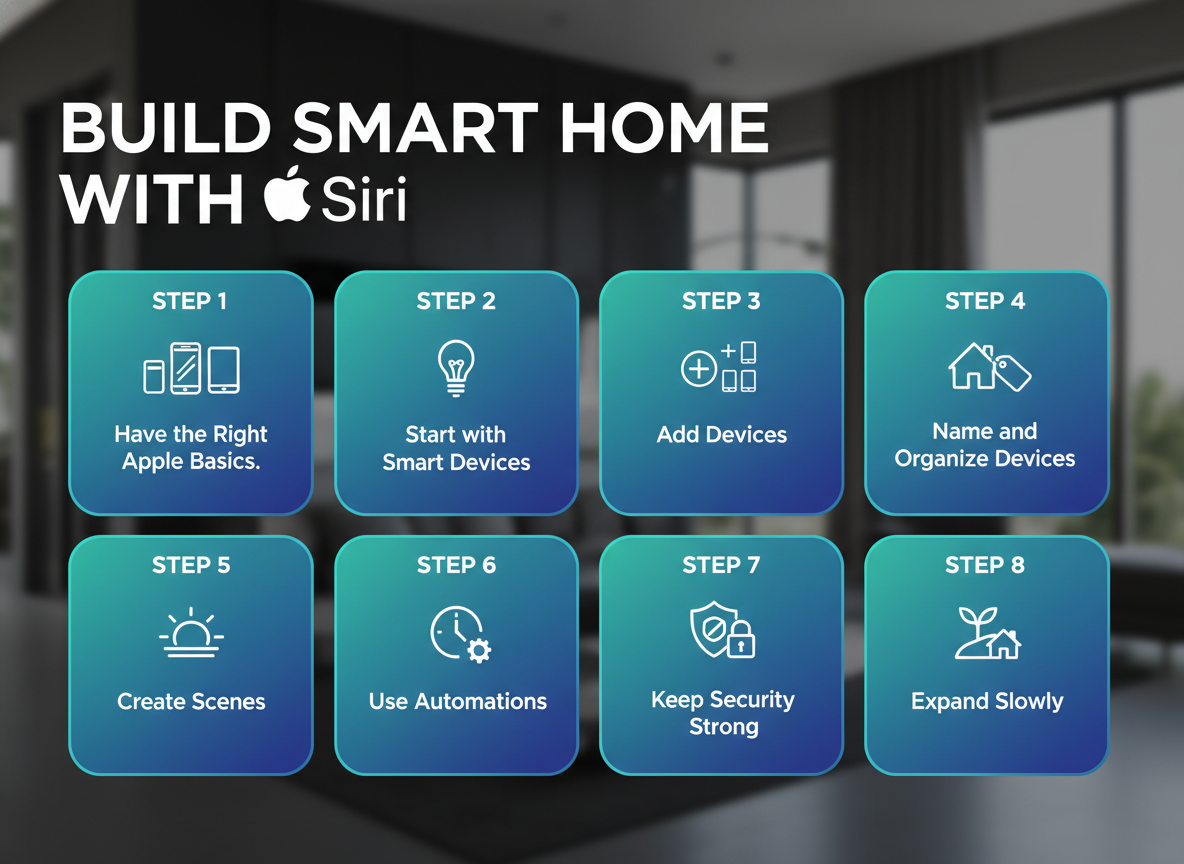
Step 1: Make Sure You Have the Right Apple Basics
The essentials:
- An iPhone or iPad (this is where setup happens)
- The Apple Home app (pre-installed on iOS)
- At least one HomeKit-compatible smart device
Additionally, you’ll need a Home hub if you want automation to run when you’re away or you want remote access to your smart home. The hub stays in your house and acts as the always-on bridge that keeps everything connected when your iPhone isn’t home. If you skip the hub, your smart home will still work locally when you’re home.
Common Home hub options include:
- HomePod mini: Small, affordable, and an excellent starter hub for most homes
- HomePod (full-size): Better sound with the same hub capabilities
- Apple TV 4K: Doubles as a streaming device and a powerful Home hub
Step 2: Start with High-Impact Smart Devices
If you’re just getting started, focus on smart devices that deliver instant convenience without adding complexity. Smart plugs are an easy win, they let you turn everyday items like lamps, fans, or even a coffee maker into voice-controlled devices. Smart lighting is another favorite, offering dimming, schedules, and color changes without any rewiring or permanent installation. If your HVAC system is compatible, a smart thermostat can quietly improve comfort while helping with energy savings. For added peace of mind, a smart doorbell or an indoor camera is optional but practical, especially if you travel or work long hours. When shopping, always look for devices labeled “Works with Apple Home”, which is Apple’s updated HomeKit branding and the easiest way to ensure smooth Siri integration.
Step 3: Add Devices to Apple Home
How to Add a Device
- Open the Home app
- Tap + → Add Accessory
- Scan the QR code on the device (or hold your iPhone nearby if supported)
- Assign it a room and give it a clear name
If there’s any problem, it can be the Wi-Fi issue or a missed permission prompt.
Step 4: Name and Organize Devices Like a Real Person
This step might feel boring, but it’s one of the most important parts of setting up a Siri-powered smart home. Most frustrations with voice control come down to sloppy naming. Siri starts responding with things like, “Which one did you mean?” Trying to make clear, thoughtful names, then commands flow naturally and reduce friction every single day.
Stick to simple rules that mirror how you already talk. Use natural language like “Kitchen Lights” instead of technical labels such as “Light Group A.” Avoid repeating generic names across different rooms, and stay consistent. A few minutes spent naming things well can make your smart home feel intuitive instead of temperamental.
Rooms and Zones
Rooms and Zones are what turn a collection of smart devices into a system that actually makes sense. Rooms represent individual spaces like the bedroom, kitchen, or home office, while Zones group multiple rooms together, such as upstairs, downstairs, or outside. This structure keeps everything organized behind the scenes and makes voice control far more natural.
Step 5: Create Scenes That Match Real Life
Scenes are where a Siri-powered smart home starts to feel thoughtful rather than technical. A scene groups several actions under one simple phrase, so instead of issuing multiple commands, you set the tone of your home in a single moment. A “Good Morning” scene might gently turn on the lights, adjust the thermostat, and open the blinds. “I’m Home” can warm up the space and start music, while “Good Night” shuts everything down and helps the house settle for sleep.
Step 6: Use Automations
Common Automation Triggers
Common automation triggers in a Siri smart home include simple, reliable cues like time of day, arriving or leaving home, detected motion, or changes from sensors such as temperature, air quality, or door activity. For example, lights can automatically turn on at sunset, the thermostat can adjust when everyone leaves the house, or the porch light can come on if motion is detected late at night. This is the point where a Siri-powered home stops feeling like a collection of gadgets and starts working in the background without needing your attention.
Step 7: Keep Security Strong, Without Feeling Watched
Apple’s approach to smart home security is intentionally restrained, and that restraint is exactly what makes it effective. Instead of constant alerts or aggressive monitoring, Apple focuses on quiet safeguards that protect your home without making it feel watched.
- HomeKit Secure Video keeps footage from compatible cameras encrypted end-to-end, so only you can view it.
- Encrypted device communication protects data as it moves between accessories and your Apple devices.
- Local processing when possible reduces how much information leaves your home in the first place.
- Granular sharing permissions let you decide who can view cameras, control devices, or receive alerts.
- Notification control ensures security stays quiet until something truly needs your attention.

Step 8: Expand Slowly and Thoughtfully
The best Siri smart homes evolve over time. Once you’re comfortable, you might:
- Add another HomePod mini to a different room
- Replace a few bulbs with a smart switch
- Try motion-based lighting in hallways
- Choose Matter-compatible devices for future flexibility
Common Mistakes to Avoid
Even well-built smart homes can hit snags if a few basics are overlooked. Problems usually start when devices are purchased without checking Apple Home compatibility, or when everything gets named “lamp” or “light,” leaving Siri unsure what you mean. Creating too many automation at once can also make troubleshooting harder than it needs to be, especially early on. Just as often, issues trace back to weak or inconsistent Wi-Fi rather than the devices themselves. And finally, expecting everything to work perfectly on day one sets you up for frustration.
Final Thoughts: A Smart Home Should Feel Calm
A smart home powered by Siri is meant to support you. It quietly handles the small things you’d otherwise have to remember, like switching off lights, easing the house into nighttime mode, or smoothing out hectic mornings. When everything runs in the background and your home simply feels calmer and more responsive, that’s when you know it’s working exactly as it should.
Related Articles
- Alexa vs Google vs Siri: Which Smart Home Assistant is Best for Your Home?
- How to Turn Your Home Smart with Alexa: Step-by-Step Guide for Easy, Secure Living
- How to Make Your Home Smart with Google: Step-by-Step Guide for Easy, Automated Living
- How to Automate Household Chores with Smart Devices: Save Time and Simplify Daily Tasks

