

If you’re a crafting enthusiast, you know the challenge of keeping your supplies organized. A messy, cluttered crafting space can hinder creativity, increase stress, and waste time. Whether you’re working with paper, fabric, paint, or beads, an organized craft corner can make a huge difference in your productivity and enjoyment. In this guide, we’ll explore 12 clever craft corner organization ideas that will help you reduce clutter, maximize space, and create an environment that inspires your best creative work.
Why Craft Room Organization Matters
Before we dive into the specific tips, let’s take a moment to reflect on why organizing your craft space is so important. Crafting is a hobby that requires a variety of materials, tools, and equipment.
Over time, these items can accumulate, leading to a chaotic space that’s hard to navigate. A cluttered craft room can not only limit your creativity but also waste time as you search for supplies that are hidden or disorganized.
By organizing your craft space, you create a more efficient environment, allowing you to find exactly what you need when you need it. Plus, an organized space fosters a sense of calm and encourages you to spend more time crafting, rather than tidying up.
1. Create Designated Zones for Different Crafts
One of the best ways to organize your craft corner is by creating designated zones for different types of crafting. For example, you can have a scrapbooking corner, a sewing station, and a painting area, each with its own set of supplies and tools.
This separation helps you quickly access what you need for specific projects and keeps everything in its place. If your space is limited, use multi-functional furniture or modular storage solutions to create flexible zones that can easily be adapted as your crafting projects change.
2. Use Vertical Storage to Maximize Space
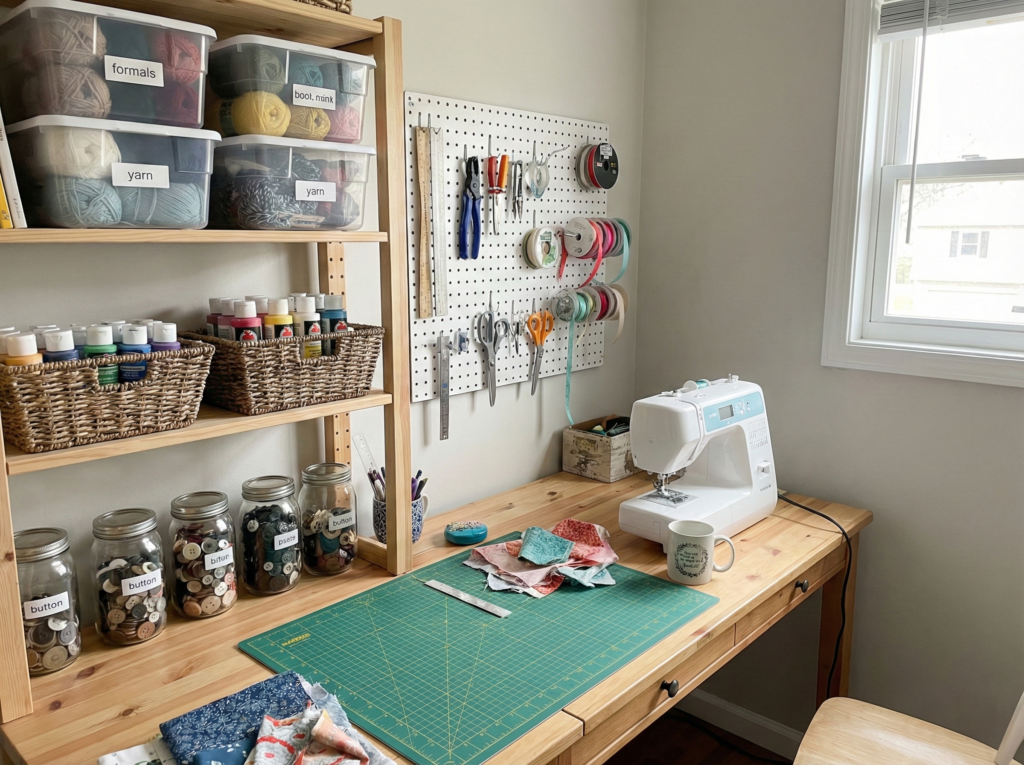
Vertical storage is a game-changer when it comes to organizing small craft spaces. Wall-mounted shelves, pegboards, and floating shelves help you utilize the space above your work area, leaving your desk or table clutter-free.
For example, a pegboard can store tools like scissors, ribbons, or even paintbrushes. It’s a fantastic way to keep your supplies visible and easily accessible. You can also hang baskets or small containers on the pegboard for organizing small items like buttons, pins, or glue sticks.
3. Invest in Clear Storage Bins and Containers
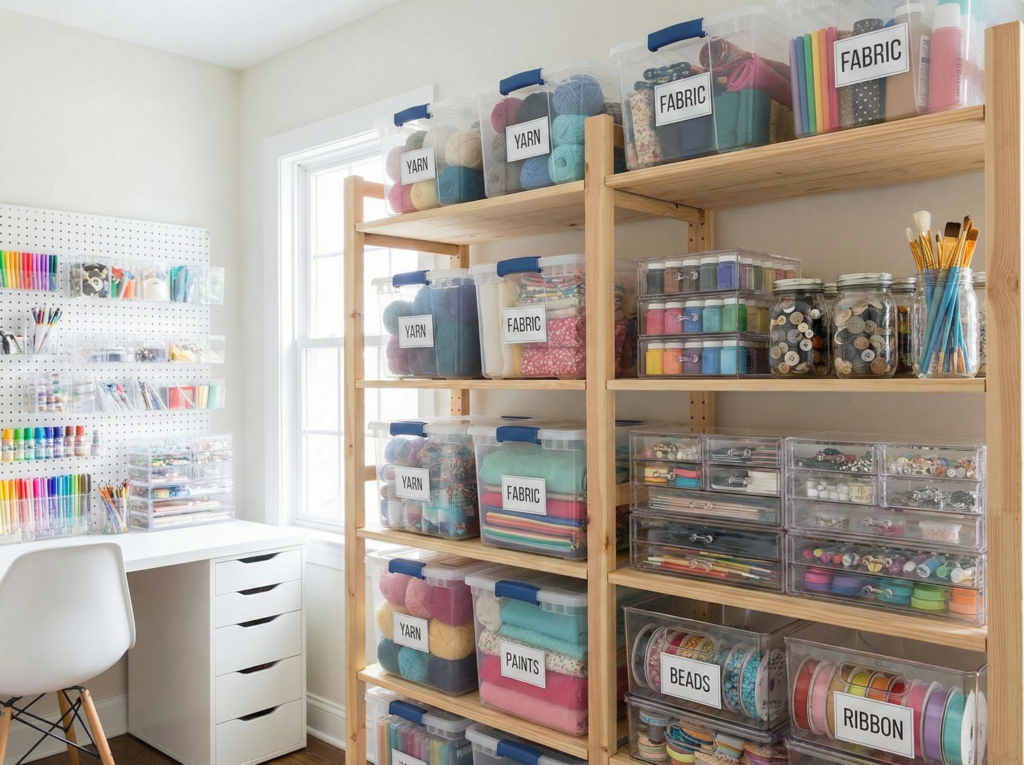
One of the simplest and most effective ways to reduce clutter is by using clear storage bins. With transparent containers, you can easily see the contents, making it quick to grab what you need without sifting through piles of materials.
Consider using stackable bins for smaller items like crafting beads, fabric scraps, or papers. Label each bin clearly to avoid confusion, and keep similar items together. For instance, you can store all your sewing notions in one bin and scrapbook paper in another.
4. Repurpose Household Items for Craft Storage
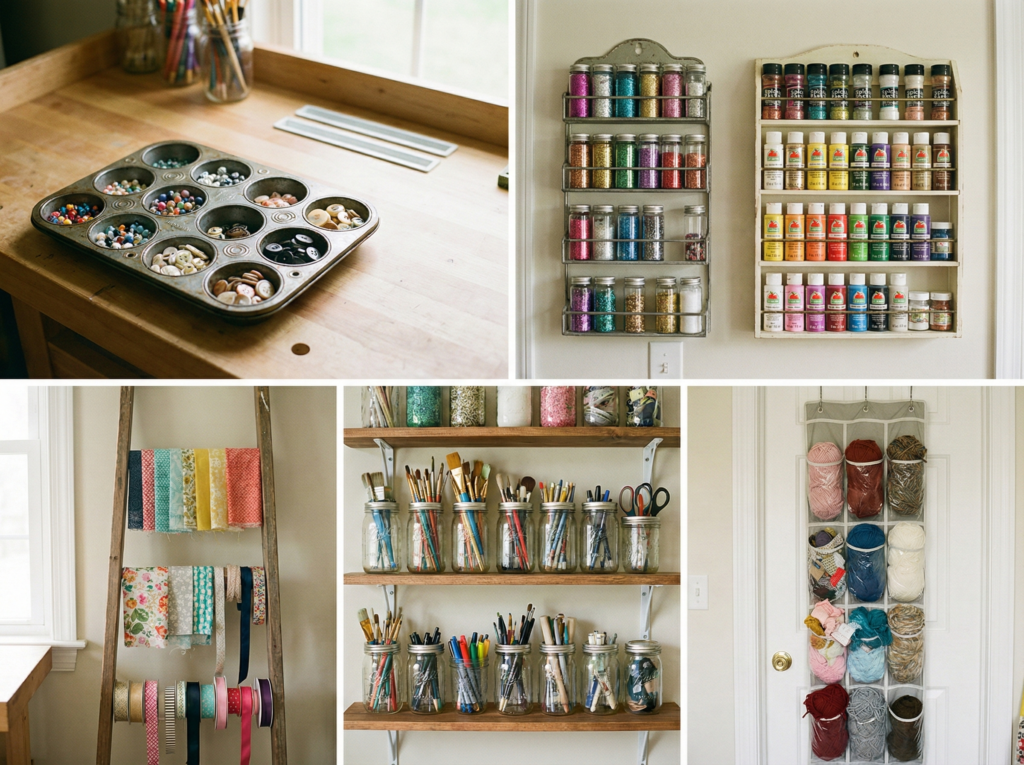
Instead of spending money on expensive organizational tools, consider repurposing household items to organize your supplies. For example, mason jars make excellent storage for buttons, beads, or paintbrushes. Old shoeboxes can be used to organize fabrics, ribbon spools, or even supplies for kids’ crafts. Repurposing items not only saves you money but also adds a personal touch to your craft space, making it uniquely yours.
5. Organize By Frequency of Use
One of the most effective organizational strategies is to store your most frequently used items in easy-to-reach places, while less commonly used items can go on higher shelves or in storage bins. For example, keep your scissors, glue, and cutting mats on your workspace, while more seasonal items or specialized tools can be tucked away in bins or cabinets. This way, your active projects always have quick access to the items you use most often, making the creative process faster and smoother.
6. Maximize Drawer Storage with Dividers
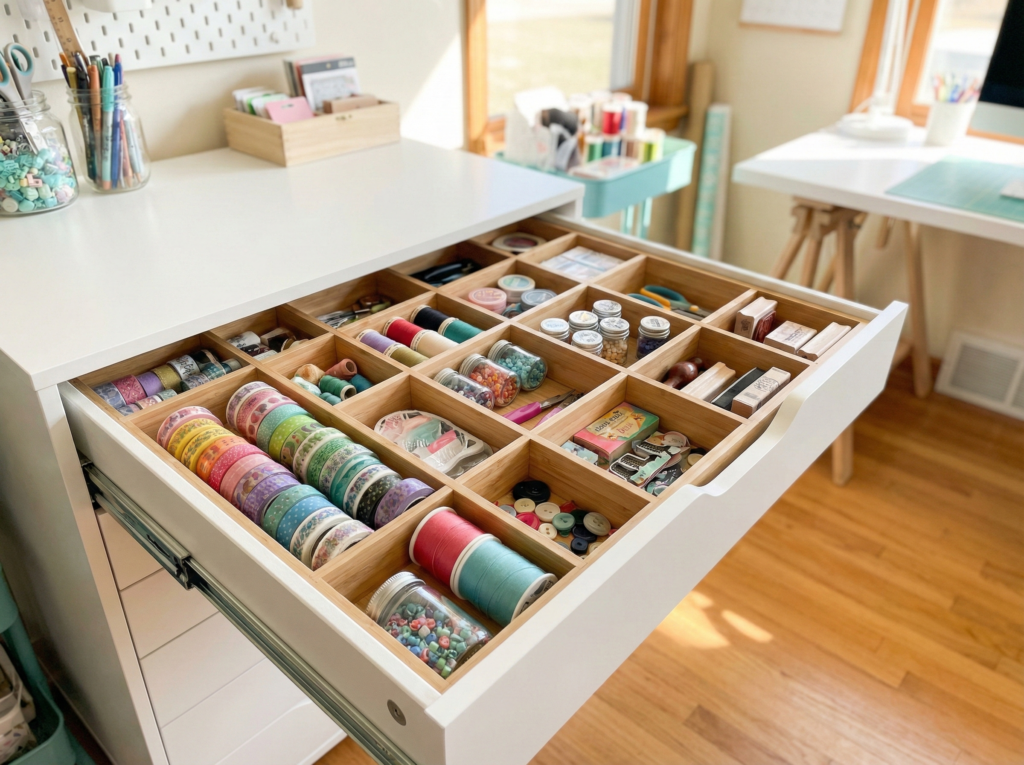
Drawers are often underutilized when it comes to organizing craft supplies. Drawer dividers are a great solution to keep small items from mixing together. You can use drawer organizers to store pens, markers, scissors, and ribbons, and even smaller craft tools like stamps or embellishments.
If you don’t have built-in drawers, consider using portable drawer units that you can move around your craft area as needed. This approach keeps your workspace neat and ensures that everything has a designated spot.
7. Use Labels for Quick Identification
Labeling is a simple but highly effective strategy for organizing your craft supplies. Whether you’re using bins, jars, or shelves, labeling everything will help you find what you need without wasting time. Labels can be as simple as handwritten tags, or you can go all-out with printed labels for a polished, cohesive look.
If you’re using jars or containers, consider adding color-coded labels to make finding supplies even easier. For example, all paint supplies could be labeled in one color, while sewing tools might have a different color.
8. Implement a Dedicated Paper Storage Solution
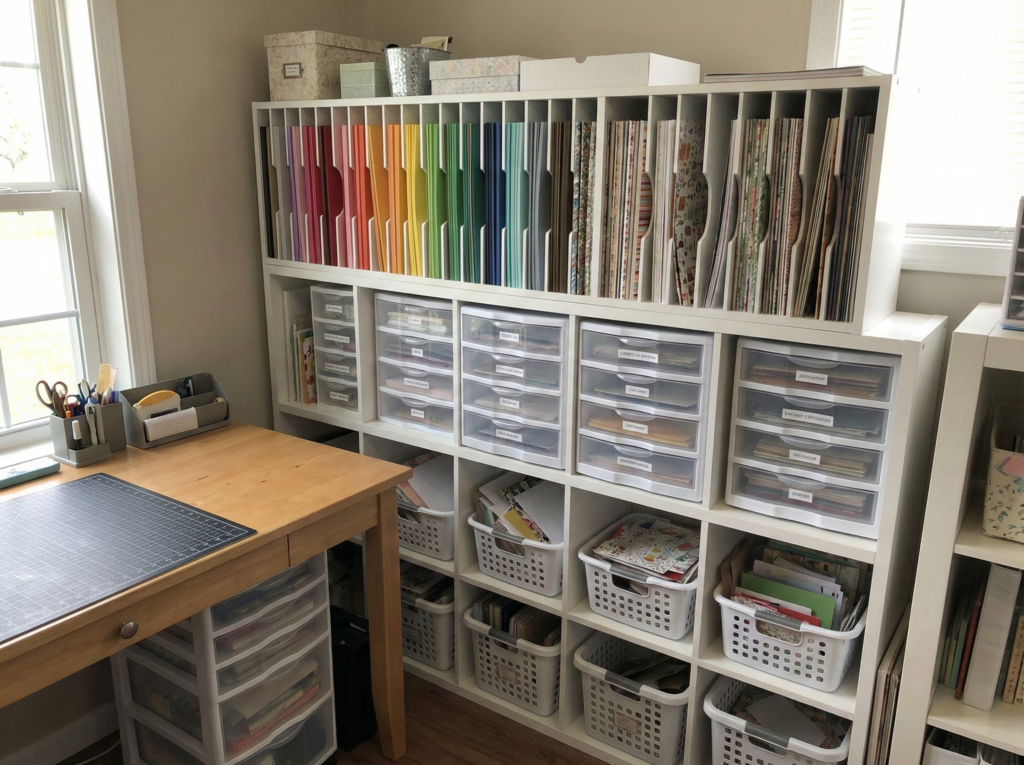
Paper storage is one of the trickiest aspects of organizing a craft room, especially if you have large quantities of scrapbook paper, cardstock, or art prints. The key is to use a system that keeps your paper flat and organized without taking up too much space.
Consider using file organizers, portfolio cases, or drawer units with wide, shallow compartments. These options will allow you to file paper by color, type, or project, keeping everything accessible while maintaining a tidy space.
9. Create a Vertical Ribbons Storage System
Ribbons are often an essential part of many craft projects, but they can quickly become tangled and chaotic if not stored properly. To organize your ribbons, use a wall-mounted rod system or a spinning rack to keep them neat and easily accessible. You can also use drawer dividers or hanging racks designed specifically for ribbon storage to prevent tangling and allow you to find the exact ribbon you need without frustration.
10. Keep Your Craft Desk Organized with Trays and Caddies
A clean, tidy craft desk is essential for a productive space. Instead of having piles of materials scattered across the table, use trays, caddies, or desktop organizers to store tools and supplies that you use frequently. These organizers will keep everything within arm’s reach, but out of the way when you need to work.
For example, a rolling caddy can store scissors, markers, or cutting mats, while trays can be used to group similar tools together, preventing them from cluttering your workspace.
11. Embrace Multi-Use Furniture
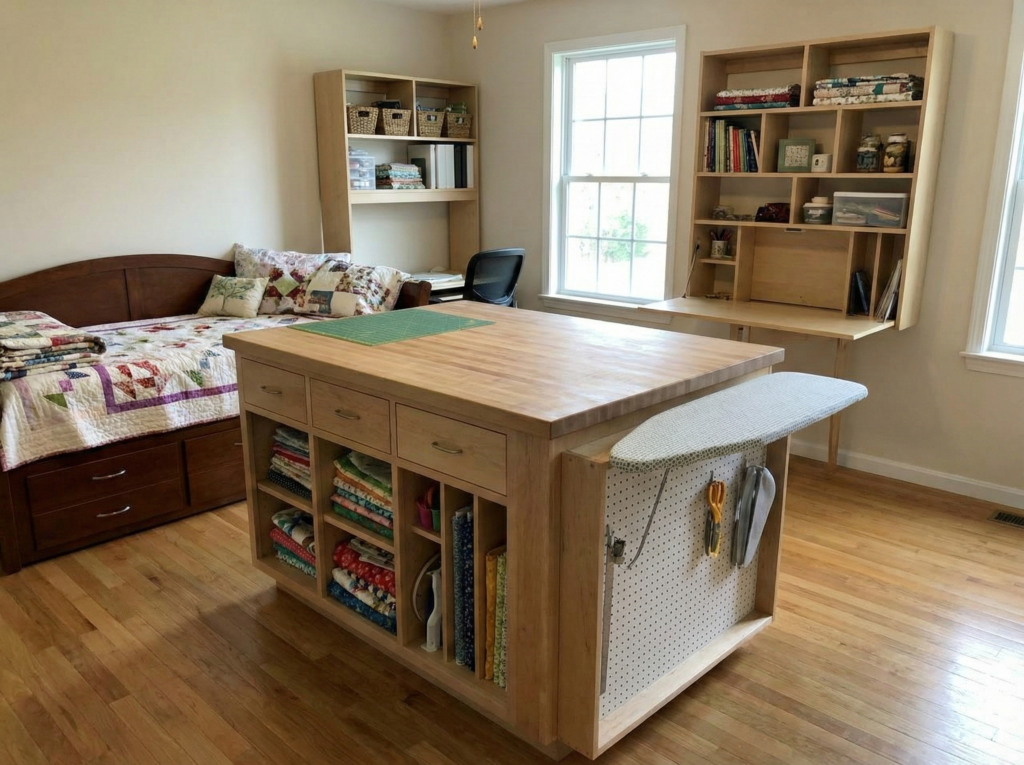
If you’re working with limited space, consider using multi-use furniture to maximize your craft corner. Opt for a storage bench, which can function as both a seat and a place to store fabric or tools, or a convertible desk that doubles as both a workspace and storage area.
This approach is especially useful for smaller rooms, where you need to make the most of every inch. The goal is to create a functional space that serves multiple purposes without overcrowding.
12. Keep It Clean and Tidy with a Regular Cleaning Routine
No matter how organized your craft space is, it’s essential to maintain a regular cleaning routine to prevent clutter from creeping back in. Set aside time each week to tidy up your craft room, put away stray items, and wipe down surfaces to keep the space feeling fresh. A few minutes of upkeep each week will ensure that your craft corner stays functional, organized, and inspiring for your next project.
Final Thoughts on Craft Corner Organization
Creating an organized craft corner doesn’t have to be overwhelming. With these 12 smart organizing tips, you can reduce clutter, maximize your space, and create a functional, inspiring space for your creative work. Whether you’re a seasoned crafter or just starting out, these ideas will help you stay organized and maintain a clean, efficient workspace that sparks your creativity.
Remember, the key to a successful craft room organization is making it fit your needs and preferences. Experiment with different storage solutions until you find what works best for your crafting style and available space. By putting these tips into practice, you’ll enjoy a clutter-free, organized environment that makes every craft project feel more enjoyable and productive.

